Monday, December 31, 2007

scale necklace

My burn out kiln broke during the summer. I kept putting off fixing it cause I didn't need to use it. I finally got around to opening it up a couple days ago. A wire had become disconnected, that was all. So I resoldered that, and it works now. I didn't even have to buy new parts.


Now that my kiln is working again I will go back to casting scales for my silver scale necklace. There is so much work to do and it is taking so long. I have not been working on it on a regular basis, but I started it in spring 2005. I work on it for a while then put it down for a long time. Usually cause I get sick of it. Its kind of depressing to work on something like this for so long. All I am doing is making the same little pieces over and over. Hundreds of them.

This is how it looked in Sept 2005. It is much bigger now, but I don't have a recent picture.


Each scale is cast sterling silver. I have 4 rubber molds of the original, so shooting the waxes goes pretty quickly. I usually cast about 20-25 at a time. It looks like I have more than that on this tree.


Cast scales.

Sunday, December 30, 2007

2007 Itami Internatonal Craft Exhibition

A few days ago I got the catalog from the 2007 Itami International Craft Exhibition at The Museum of Arts and Crafts - Itami, in Itami, Japan. I had 3 pieces in the exhibition. Its an annual exhibition, the theme this year was jewelry. I mostly like the other work that was in the exhibition, but I wish they had printed what some of these pieces are, brooch, pendant, etc. Some of these things I have no idea what they are.

The exhibition was up from the end of Oct till the end of Nov. I wish it had started a month earlier, cause I went to Japan, not too far from Itami, in Oct after I was in Korea for the Cheongju Craft Biennale.

They rephotographed the work for the catalog. This is a scan of the photo of my work from the catalog:

Saturday, December 22, 2007

close to the skin

I found out yesterday that I got 3 pieces into a juried jewelry exhibition called Close to the Skin. It will be held at the Armory Art Center in West Palm Beach, Florida, Jan 24- Feb 23. These are the pieces that got in:


Wednesday, December 12, 2007

making tools

I took a machine shop class at the College of Du Page this fall, I also took a machine shop class over the summer. Tonight was the last night of the class, and I was finishing my last project, which was a filing jig. I already have one I bought, so I made mine a little different, I gave it a 30 degree angle instead of a 45 degree angle. The tool suppliers say they are good for holding pieces to saw. I think they are terrible for sawing, I just like them for filing, mostly I just use them for 90 degree angles. I don't use it very often, but when I need it I think its great. Like for filing all those rivet spacers on my teapot.

I only took a couple pictures of making it. This is a horizontal mill, I am cutting the grooves to hold wire or tubing. I am using that large cutter to cut the tiny grooves cause it was the only one that had the angle I wanted. Its 120 degrees, the smaller cutters were around 90 degrees or less.


I am cutting the grooves on the middle piece of the tool. The side opposite the one I am cutting has the 30 degree angle, so I needed something to hold it at 90 degrees while I cut the flat side. That's why its in a smaller vise in the bigger vise.


Mine is the one on the bottom. I still need to drill holes in it, harden and temper it, and grind it. The one I bought is on the top. Mine is made of 1/2" thick O-1 steel, the one I bought is about 1/4", or maybe a little thicker.


This is after the holes have been drilled and it has been heat treated.


This I after I made the rods to hold it together. The rods are 1/4" O-1 steel. At this step all that's left to do is grind it with the surface grinder and make some nuts to hold it together. I have been using normal nuts from a hardware store till I can make some nicer ones.


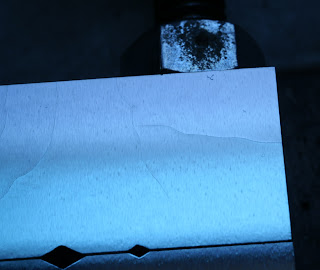
Grinding is done. But there was a problem. After it was made nice and smooth and shiny from grinding I was able to see fine cracks all over. The most are on the top piece, the middle piece has a bunch, and there's a few on the bottom piece. I showed it to my two instructors, they didn't know why it happened. One of them was there when I did the heat treating, after hardening it, it wasn't more than maybe 5 minutes before it went in the oven for tempering. We looked at them under a microscope, they don't look deep, so I think it will be ok. But I really don't like these cracks. They said maybe I could grind them out... but since we don't really know how deep they are maybe I would end up grinding all night. I didn't feel like grinding it more.


Here are some photos of the cracks.


Monday, December 10, 2007

teapot process - finished piece

Here are the photos of the finished piece.


Here I am in Cheongju, S.Korea at the 5th Cheongju International Craft Competition in October, where I won the silver prize in the metals category.

teapot process - part 6

Here I am with my finished teapot. Actually I don't think I was totally finished, I think I was still working on the base.


I had to ship it to Korea the day after I finished. I made a box to ship it in. Each piece was wrapped in cloth before going in its compartment.


That box went inside another box with padding. There was no way that thing was getting damaged during shipping.

teapot process - part 5

Before anything that involved the aluminum parts could be assembled I had to anodize them. This is a photo of my anodizing set up where I anodized the parts.


Once everything was anodized I could start putting it together. I am attaching the silver sleeves to the handle with rivets in this photo. I have the whole piece wrapped in a paper towel and tape so I cannot accidentally scratch the anodized surface.


These are the pieces of silver tubing I used as spacers on the rivets to put a space between the two aluminum parts of the handle and the two aluminum parts of the base.


Here I am putting the handle together.

I am getting ready to rivet. There are 20 rivets, not counting the 2 that will attach it to the body of the teapot.


Again I wrapped the handle in tape to keep from damaging the anodizing. I worked on a couple rivets at a time and kept the rest of the handle covered. It is kind of annoying to have to keep taping it, removing tape, and re-taping it, but I think it is worth it when I consider the possible consequence of not being so careful. I really hate getting a scratch in my anodizing before I am even finished. And if I wanted to re-anodize the handle I would have to remove all the rivets and the sleeves, which would be a lot of work.


In this photo all the rivets are done, and I am sanding them so they are all the same height.

I put a slightly matte finish on the teapot. I don't like high polished silver.

I am almost finished.


The handle isn't actually attached. If you look closely you can still see the two holes for the rivets that will hold the handle on.


The two parts of the base are read to be riveted together.


Taped up to avoid an accident.


All the rivets are in. I am working on the 4 that hold the aluminum to the big silver piece.

teapot process - part 4

This is the lid. I made a handle out of plastiform from Otto Frei to hold the lid while I worked on it. All the tool suppliers sell the stuff under different names. Its a plastic that gets soft when its heated and you can use to to hold parts. I think its great.


The handle.


One end holds the piece from the top, the other end holds the piece from the bottom.


The mostly finished lid.


This bottom piece was very difficult to fit to the curve of the lid.


I hadn't given much thought on what the spout would look like. I made some clay models to try to decide.


There were a few other ideas, but I went with this one.


After deciding on the shape and size of the spout I cut holes in the body of the teapot. I this photo I have only drilled the holes, I filed them all square to make them look nicer.


This is the spout in progress. I made it at Haystack in July 2006 when I was there as Chunghi Choo's assistant. I messed up the first one and had to make a second, which I barely had enough silver for.


I have the two parts taped up so I don't damage the edges of them while I sand the rest of the teapot.


More sanding.