Showing posts with label mill. Show all posts

Thursday, May 8, 2008

2nd hammer

This is the 2nd hammer head I made during the class. It's about the same as the one in my previous post. This one is not quite finished.

I started with round stock, cause there wasn't any square stock available in the right size. I cut one end on the lathe to the diameter I wanted the face to be.

Then I cut the rest of it square.

I put the vise at an angle to cut the tapered part behind the face.

I put it in the vise at an angle to cut the cross peen.

These photos are after I filed out the machining marks, and ground a few parts by hand. This is how it looks right now. I need to sand it. I don't know if I will harden this one, I might just work harden the face.

Wednesday, December 12, 2007

making tools

I took a machine shop class at the College of Du Page this fall, I also took a machine shop class over the summer. Tonight was the last night of the class, and I was finishing my last project, which was a filing jig. I already have one I bought, so I made mine a little different, I gave it a 30 degree angle instead of a 45 degree angle. The tool suppliers say they are good for holding pieces to saw. I think they are terrible for sawing, I just like them for filing, mostly I just use them for 90 degree angles. I don't use it very often, but when I need it I think its great. Like for filing all those rivet spacers on my teapot.

I only took a couple pictures of making it. This is a horizontal mill, I am cutting the grooves to hold wire or tubing. I am using that large cutter to cut the tiny grooves cause it was the only one that had the angle I wanted. Its 120 degrees, the smaller cutters were around 90 degrees or less.


I am cutting the grooves on the middle piece of the tool. The side opposite the one I am cutting has the 30 degree angle, so I needed something to hold it at 90 degrees while I cut the flat side. That's why its in a smaller vise in the bigger vise.


Mine is the one on the bottom. I still need to drill holes in it, harden and temper it, and grind it. The one I bought is on the top. Mine is made of 1/2" thick O-1 steel, the one I bought is about 1/4", or maybe a little thicker.


This is after the holes have been drilled and it has been heat treated.


This I after I made the rods to hold it together. The rods are 1/4" O-1 steel. At this step all that's left to do is grind it with the surface grinder and make some nuts to hold it together. I have been using normal nuts from a hardware store till I can make some nicer ones.


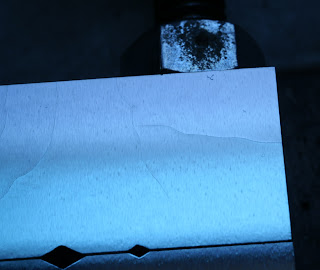
Grinding is done. But there was a problem. After it was made nice and smooth and shiny from grinding I was able to see fine cracks all over. The most are on the top piece, the middle piece has a bunch, and there's a few on the bottom piece. I showed it to my two instructors, they didn't know why it happened. One of them was there when I did the heat treating, after hardening it, it wasn't more than maybe 5 minutes before it went in the oven for tempering. We looked at them under a microscope, they don't look deep, so I think it will be ok. But I really don't like these cracks. They said maybe I could grind them out... but since we don't really know how deep they are maybe I would end up grinding all night. I didn't feel like grinding it more.


Here are some photos of the cracks.


Tuesday, November 20, 2007

working

I worked on my new piece tonight, but didn't really accomplish much. Then I was about to anodize some earrings and decided they were too thick, so I milled about 1.5mm off the back. They are square, and had carving on the front, so I had to be careful about not damaging the carving. I used super glue to hold them while I milled them. I use super glue quite a bit for milling things like that. It works so well and I don't have to worry about the vise, or clamps damaging the part. I have to take lighter cuts though. Once I had a part come off and get damaged, but it wasn't anything important.

While I was milling I remembered I wanted to make some steel knobs to replace the plastic ones on my mill. So I made one on the lathe, its a little short, I'll make better ones later. It wouldn't have taken long except I had to search to find the tools I needed. After I was finished with that I didn't really do anything else. I felt productive making the metal knob, but it wasn't really since I need to finish pieces, and I don't really need a metal knob for my mill.

Monday, November 5, 2007

handpiece holder

I worked on the candlesticks some more tonight. I finished anodizing the triangular pieces. Tomorrow I will work on the square ones. I also worked on a hand piece holder for my PUK 2 welder.

Milling with my Sherline mill:

I am working on the base of the hand piece holder. I have the part super glued to the angle plate. The PUK 2 is the metal box in the background.

I really need to make some kind of enclosure for the mill to keep these chips from going every where like they do now.


So I finished milling the parts and went to anodize them. Both of the parts are made from different pieces of scrap aluminum, so I don't know what the alloys are. I anodized both pieces for the same amount of time, and used the same dye. The piece on the right I anodized first. The color was very light even though I left it in the dye for almost 10 minutes. The big square piece was in the dye for about 1 minute. I like the color of the bigger piece better. I will redo the smaller piece and try to get the color to match the larger piece by anodizing it longer.